


Prerequisites: Basic knowledge of JavaScript
Outline
- Intro
- Block class
- USDevBlockchain
- Mining
- Transactions and rewards
- Transaction signature
Intro
In the first part of the blog, we have introduced the notion of blockchain and covered the basic concepts. You could dig a lot deeper if you want, but that is the minimum knowledge we need to move on to the next step of the blockchain system of our own. In this part, we will make a blockchain system called USDevCoin. With the help of our system, users will be able to exchange USDev coins and every transaction will be securely stored as blocks in the chain. Now, by no means the system will be secure enough actually to perform the role of a blockchain, but it will be enough to demonstrate the infrastructure. There is a lot to do, so let’s dive right in!
Environment setup
Before getting started, we need to ensure that we have the latest version of Node installed on our machine. Once you confirm it, go ahead and create the main JavaScript file.
We will call the file chain.js and write the first class Block.
Block class
// chain.js
class Block {
	constructor(index, payload, timestamp, previousHash = ""){
		this.index = index;
		this.payload = payload;
		this.timestamp = timestamp;
		this.previousHash = previousHash;
		this.hash = "";
	}
}
The are four arguments given in the constructor of the class Block. They have the following purposes:
index – it will be the index of the block in the chain
payload – data that the block holds. It could be anything. In our case, we will store the number of coins being transferred in this parameter
timestamp – date and time of the record when it was created
previousHash – since we are going to be chaining the blocks, this argument will refer to the hash of the previous block
If you have noticed, we initially set the hash value of the class to an empty string. Now we need a way to calculate the hash value of the block. Hash value entails taking a range of arguments for a digital record, and creating a unique signature. The important thing about this hash is that it always should return the exact same value when we provide identical parameters.
In JavaScript however, the hashing function is not included by default. So we have to use a third-party library called crypto-js.
So we need to run npm install --save crypto-js in our project folder and import the hashing function from the node module. We will specifically use the SHA256 algorithm for hashing.
// chain.js
const  SHA256 = require("crypto-js/sha256");

class Block {
	constructor(index, payload, timestamp, previousHash = ""){
		this.index = index;
		this.payload = payload;
		this.timestamp = timestamp;
		this.previousHash = previousHash;
		this.hash = this.getHashValue;
	}
	getHashValue() {
		return SHA256(
		  this.index +
		  this.previousHash +
		  this.timestamp +
		  JSON.stringify(this.payload)
		).toString();
	}
}
SHA256 algorithm processes the values and returns the hash value as a string. We also need to update the constructor with the new function, so that the hash automatically gets calculated upon creation of a block.
USDevBlockchain class
The next step is to add the USDevBlockchain class.
class USDevBlockchain {
  constructor(){
    // Chain is an array of blocks
    this.chain = [this.getFirstBlock()];
  }

  // We have to create the first block manually
  getFirstBlock() {
    return new Block(0, "First Block (Genesis Block)", new Date(), "0");
  }

  // Returns the latest block in the array
  getLastBlock(){
    return this.chain[this.chain.length - 1];
  }

  // Adds new block
  addNewBlock(newBlock){
    newBlock.previousHash = this.getLastBlock().hash;
    newBlock.hash = newBlock.getHashValue();
    this.chain.push(newBlock);
  }

  // It checks if the blocks are chained properly and valid
  validateChain(){
    for(let i = 1; i < this.chain.length; i++){
      let prevBlock = this.chain[i-1];
      let currBlock = this.chain[i]

      // Check if each block's hash value was not modified
      if(currBlock.hash !== currBlock.getHashValue()){
        return false;
      }

      // Check if the blocks are chained correctly
      if(currBlock.previousHash !== prevBlock.hash){
        return false;
      }
    }
    return true;
  }
}
Let’s go through all of the features of this class.
constructordefines the chain as an arraygetFirstBlockcreates the initial block in the chain. This first block is usually called the Genesisblock. We need to create it at the beginning manuallygetLastBlockreturns the latest block in the chain. We need to know this to connect the new block to the chainaddNewBlockis self-explanatory. It adds a new block to the chainvalidaChainchecks if the chain is valid
We can test our classes to make sure that we are not missing anything
const USDevCoin = new USDevBlockchain();
USDevCoin.addNewBlock(new  Block(1, {amount:  2}, new  Date()));
USDevCoin.addNewBlock(new  Block(2, {amount:  5}, new  Date()));
console.log(JSON.stringify(USDevCoin))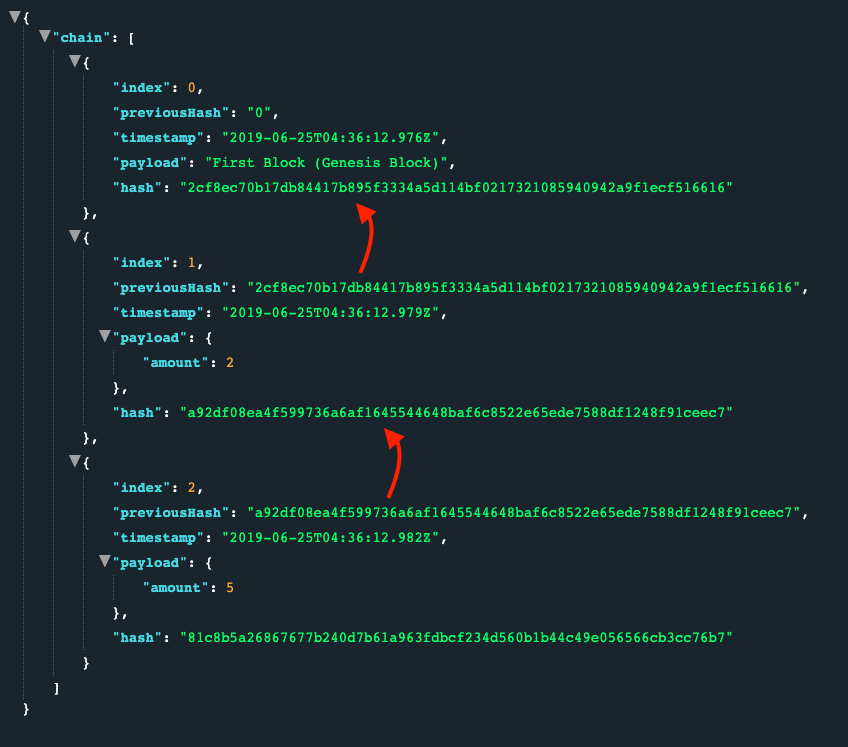
We can test the validation function as well.
const  USDevCoin  =  new  USDevBlockchain();
USDevCoin.addNewBlock(new  Block(1, {amount:  2}, new  Date()));
USDevCoin.addNewBlock(new  Block(2, {amount:  5}, new  Date()));

console.log(USDevCoin.validateChain()); // Prints "true"

USDevCoin.chain[1].payload  = {amount:  290}; // Someone tampers with the chain

console.log(USDevCoin.validateChain()); // Prints "false"
Mining
The current state of the application is not only incomplete but also fragile. Because it allows us to add new blocks to the chain very quickly, spammers can take advantage of this weakness and try to add a huge number of blocks at the same time and eventually break the system. Or the whole chain could be overwritten with a powerful machine. To prevent all of these from happening, we need to implement a method to enforce the system to wait for a certain amount of time before adding a new block to the chain.
For example, Bitcoin requires the hashes to have a specific number of zeros at the beginning. That number is also called the difficulty. It is hard for the machines to find the hash value with the exact amount of zeros at the beginning. So it will take time and tremendous computational power to come up with that value. Since the whole system is distributed, there are a bunch of networks competing against each other to find the correct value. The good thing about mining is that even though it takes a long time to process, it is swift and easy to verify if the work was completed correctly. The entire step is called proof-of-work. Now let us implement it in our code.
In order to add the proof of work step to the system, we need to add a new function to the Block class. This function basically has a while loop which does not stop until it matches the requirement we specify in the arguments.
class Block {
	constructor(index, payload, timestamp, previousHash = ""){
		this.index = index;
		this.payload = payload;
		this.timestamp = timestamp;
		this.previousHash = previousHash;
		this.hash = this.getHashValue;
		this.nonce = 0;
	}
	// .........
	mineNewBlock(difficulty){
		 while(this.hash.substr(0, difficulty) !== Array(difficulty + 1).join("0")){
		   this.nonce++;
		   this.hash = this.getHashValue();
		 }
	}
}
mineNewBlock function takes difficulty as a parameter. The difficulty is another term used in the blockchain world. In simple terms, it defines the level of difficulty to mine new blocks. Bitcoin for example is designed to take about 10 minutes to mine a new block. That timeframe could be increased or decreased by manipulating the difficulty parameter.
The while loop waits until the hash generated has the specified number of zeros at the beginning given in the difficulty property.
Then we have to modify the addNewBlock function to include the newly created function in the Block class. While calling the mineNewBlock function, we send the difficulty defined in the constructor.
class USDevBlockchain {
  constructor(){
    // Chain is an array of blocks
    this.chain = [this.getFirstBlock()];
    this.difficulty = 3;
  }
  // .....
  // Adds new block
  addNewBlock(newBlock){
    newBlock.previousHash = this.getLastBlock().hash;
    newBlock.mineNewBlock(this.difficulty);
    this.chain.push(newBlock);
  }
  // ....
}
Transactions and Rewards
As the name of our blockchain USDevCoin indicates, we are going to use our system for making a cryptocurrency. The most critical part of the cryptocurrencies is the ledger of transactions. Coins get transferred from one user to another, and that action gets recorded as a single transaction. However, one transaction alone cannot be stored as a whole block in the chain. Because of the proof-of-work security layer we have in place.
Again, going back to Bitcoin. We earlier mentioned that it takes about 10 minutes to mine a single block. But in 10 minutes we cannot process only one transaction. That would be an incredibly useless system. So there are thousands of transactions happening within that timeframe. While the network waits for about 10 minutes, those transactions get added to a queue and stay as pending transactions. Once a new block gets mined, all of the pending transactions will be included in that new block and the block is added to the chain.
It means that we have to modify our Block class to include an array of transactions, instead of just a random data object.
// chain.js
const SHA256 = require("crypto-js/sha256");

class Transaction {
  constructor(fromAddress, toAddress, amount){
    this.fromAddress = fromAddress;
    this.toAddress = toAddress;
    this.amount = amount;
  }
}

class Block {
  constructor(transactions, timestamp, previousHash = ""){
    this.previousHash = previousHash;
    this.timestamp = timestamp;
    this.transactions = transactions; // Data -> Transactions
    this.hash = this.getHashValue();
    this.nonce = 0;
  }

  getHashValue() {
    return SHA256(
      this.previousHash +
      this.timestamp +
      JSON.stringify(this.transactions) +
      this.nonce
    ).toString();
  }
  //...
}
Then in our USDevBlockchain class we need to make some drastic modifications. Let’s write the code first and then we will go through each addition on by one.
class USDevBlockchain {
  constructor(){
    // Chain is an array of blocks
    this.chain = [this.getFirstBlock()];
    this.difficulty = 3;
    this.pendingTransactions = [];
    this.rewardForMiners = 20;
  }
  //....
  mineBlockForPendingTransactions(minerAddress){
    let newBlock = new Block(this.pendingTransactions, new Date(), this.getLastBlock().hash);
    newBlock.mineNewBlock(this.difficulty);
    this.chain.push(newBlock);

    // When a new block is mined, reward the miner
    // But the reward will be available with the next block
    this.pendingTransactions = [
      new Transaction(null, minerAddress, this.rewardForMiners)
    ];
  }

  addTransactionToList(transaction){
    this.pendingTransactions.push(transaction);
  }

  getWalletBalance(address){
    let bal = 0;
    for(let block of this.chain){
      for(let t of block.transactions){
        if(t.fromAddress === address){
          bal -+ t.amount;
        }
        if(t.toAddress === address){
          bal += t.amount;
        }
      }
    }
    return bal;
  }
  // .....
}
- We added the
pendingTransactionsproperty, which will store an array of transactions that are still waiting to be included in a new block rewardForMinersproperty defines the number of coins that will be given as a reward for mining the blocks. Since mining requires a lot of computations and machine power, the miners must be compensated for their work.addTransactionToListfunction takes a transaction record and adds it to the list of pending transactionsmineBlockForPendingTransactionsfunction grabs the list of pending transactions and adds them into the newly mined block when it is completed. Also, once the block is mined, the reward coin for the miner will be stored as a pending transaction. Which means is not available right away. It will be given to the miner on the next completion of mining a new block.getWalletBalancereturns the current balance of an address
Transaction signature
Currently, there is a massive problem with our cryptocurrency system: anyone can use any coin in the network. In other words, people can spend the coins that are not even theirs.
To fix this issue, we need to sign each transaction with a private key. By signing I mean adding a signature property to each transaction. So that when we do the calculations to get the wallet balance, we know whom that transaction belongs to. We can get the private key by utilizing the elliptic module.
Let’s get the public and private keys first. In the main project folder run npm i --save elliptic, create a new file called key.js and add the following code.
const EC = require("elliptic").ec;
const ec = new EC("secp256k1");

const keyPair = ec.genKeyPair();
const publicKey = keyPair.getPublic("hex");
const privateKey = keyPair.getPrivate("hex");

console.log("Public: " + publicKey); // Wallet address
console.log("Private: " + privateKey); // Used to sign
secp256k1 algorithm is actually used in Bitcoin to generate keys. Once we run node key.js we will see two keys on the console: one private and one public.
Public: 0419034253dc7f431983904da1adba98fb766a1669f7b8c55d03fb4d2381a1340b88d52c4f26936cab7ee6473285b2d891ad0552ceb1431fd7fab36ca4bfbf4769
Private: c6e9fb1a2b8954e3af2f92ba4ddfb7f8328f6288f4c53f93e7c6aca0a29148b9
Private key should never be shared with others because it is used to sign transactions. Public key serves as a wallet address, so it can be shared with the public.
Next we need to add a few modifications to the chain.js file.
First we need to change the Transaction class to reflect the signing process.
class Transaction {
  constructor(fromAddress, toAddress, amount){
    this.fromAddress = fromAddress;
    this.toAddress = toAddress;
    this.amount = amount;
  }

  getHashValue(){
    return SHA256(
      this.fromAddress +
      this.toAddress +
      this.amount
    ).toString();
  }

  signTransaction(key){
    if(key.getPublic("hex") !== this.fromAddress){
      throw new Error("Invalid signature");
    }
    this.signature = key.sign(this.getHashValue(), "base64").toDER("hex");
  }

  isTransactionValid(){
    if(this.fromAddress === null) return true;
    if(!this.signature ||  this.signature.length === 0){
      throw new Error("No signature was found.");
    }

    const publicKey = ec.keyFromPublic(this.fromAddress, "hex");
    return publicKey.verify(this.getHashValue(), this.signature);
  }
}
signTransaction and isTransactionValid functions add a signature to each transaction, and verify the existing ones with the help of elliptic node module.
And in the Block class, we can add a new function to validate all the transactions that block holds.
class Block {
  // ......
  hasValidTransactions(){
    for(const t of this.transactions){
      if(!t.isTransactionValid){
        return false;
      }
    }
    return true;
  }
}
Now, let’s create an index file to test all of the code.
Make sure to export the classes from the chain.js file.
const EC = require("elliptic").ec;
const ec = new EC("secp256k1");
const { USDevBlockchain, Transaction } = require("./chain");

const key = ec.keyFromPrivate("c6e9fb1a2b8954e3af2f92ba4ddfb7f8328f6288f4c53f93e7c6aca0a29148b9");
const walletAddress = key.getPublic("hex");

const USDevCoin = new USDevBlockchain();
const t1 = new Transaction(walletAddress, "someone else's wallet address", 2);
t1.signTransaction(key);
USDevCoin.addTransactionToList(t1);

USDevCoin.mineBlockForPendingTransactions(walletAddress);

const t2 = new Transaction(walletAddress, "someone else's wallet address", 2);
t2.signTransaction(key);
USDevCoin.addTransactionToList(t2);

USDevCoin.mineBlockForPendingTransactions(walletAddress);

console.log("My balance: " + USDevCoin.getWalletBalance(walletAddress));

//Prints: My balance: 96
Link to GitHub
In the next and last part of this blog, we will create a neat user interface that will implement the blockchain system we have built.
Cheers!