


Serverless technology is taking over the back-end development world. Some businesses are already dumping microservices infrastructure and switching to serverless. However, the learning curve for serverless is pretty steep and it comes with great complexity. Netlify is trying to solve that problem by providing create & drop functions. In this article, we learn about the main concepts of serverless technology and create a sample application using Netlify functions and React.js.

Pre-requisites:
- Basic knowledge of JavaScript and React
- React version 16.8+
Since the introduction of AWS Lambda functions in 2014, the word Serverless has been gaining great popularity among businesses and developers. It was told to be the next generation of DevOps after the explosion of containerization. Some people call it the real evolution and say that it will be the future of DevOps. However, the majority has been reluctant to adopt it. They claim that it is not secure enough or requires too much setting up. Which one is more accurate, is everything going to be “serverless” soon or is it just an unjustified hype that will fade away over time?
Either way, we cannot know what will happen in the future. What we can do is to learn about the technology as much as we can and decide if it is a good fit for our development needs or not. Below we will briefly discuss the concepts serverless methodologies and then build a sample application using Netlify functions and React.js.
What is Serverless again?
Serverless is an execution model where cloud providers such as AWS or Azure are responsible for provisioning, maintaining and managing servers for running code. In simpler terms:
- Serverless or FaaS (Functions as a Service) is a way to run functions and create APIs without setting up your own servers
So there are servers involved in this model. The difference is – cloud providers handle everything related to servers for a fee, and businesses focus on writing functions.
How is this different from Monolithic way of building applications and Microservices?
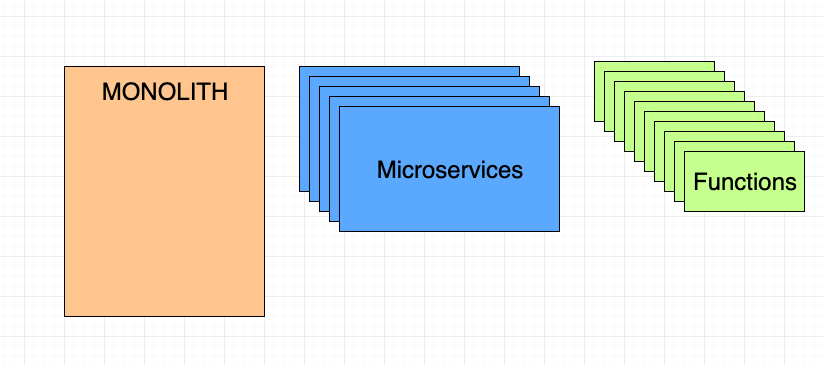
As we can see from the picture, the monolithic way is usually the easiest way to setup and build, but it creates major issues when it comes to scaling. Microservices are widely used among many large companies nowadays. However, they require great effort to configure and maintain. Serverless can be a great option when implemented correctly.
Advantages and disadvantages of Serverless
Just like any stack, serverless has its own pros and cons. It is up to the businesses to consider all use cases and make an informed decision. Let us take a look at the pros of serverless model.
Advantages
- Auto scaling Since servers are managed by the FaaS providers, they (almost) guarantee auto scaling of your applications. No need to load balance or worry about the inbound traffic surge. System can automatically spin up new function instances during rush hours, if necessary.
- Pay for what you use Let us say that we have an application used by thousands of people during the day, and no one really uses it at night. With monolithic or microservices models, we pay for every hour our application runs on the servers – 24/7. With serverless model we pay per request. If there are no requests made at night, we don’t pay anything.
- Focus on business logic Does serverless mean zero DevOps? Absolutely not. However, it dramatically reduces the amount of work related to infrastructure. FaaS providers take care of most of the tasks which are usually on DevOps engineers’ plates. No need to buy/manage/maintain servers. Businesses can spend more time on core features, user experience and design.
Disadvantages
- Cold starts When a serverless function is called for the first time, it may take up to several seconds to execute the function. It can be frustrating if the function is a critical part of the system. However, there are ways to avoid this issue. One one of them is to run
cron jobs. Which means setting up a script that gets triggered periodically and calls the function. So that the next time when real requests come in, the function will be “warm” and ready to execute. - Locked in with vendors It would require tremendous amount of work to set up your own FaaS infrastructure. So we are limited to a number of FaaS providers for now. There are currently 3 vendors that are dominating the cloud: AWS, Azure and Google Cloud Platform. Once you choose one of the vendors, your application’s fate will depend on the vendor. They can increase or lower the prices as much as they want and change the rules as often as they need. It is not very flexible.
- Complexity Admittedly, learning curve for serverless is steep. With auto scalability and fine granularity comes great complexity. There is more wiring to do at the beginning of the project. However, little patience and experimenting can bring huge savings and improve scalability and maintainability.
What are Netlify functions?
Netlify functions are serverless functions that can be deployed along with the rest of your site to create modern and scalable backend.
They are the real revolution in serverless world. Netlify functions are powered by AWS Lambda and require no setup or ops. Typically, when we want to setup an AWS Lambda function, we need to go through more than 20 steps. Such as creating an AWS account, managing service discovery, configuring API gateways and coordinating deployments and more. Netlify functions take care of the setting up part and allow us to just drop the folder with functions in our project and viola! We have a back-end!
Naturally, there is a certain limit set on the number of function calls we can make in a month for free (125k). But if going serverless is the best option for the business, it is totally worth paying extra money for more bandwidth.
All Netlify functions are version controlled and can be written in JavaScript or Go.
Semantic Weather App
In this section we will be building a simple weather app with Netlify functions, ReactJS and Semantic-UI
Tutorial
Step 1
Before we get started, make sure that you have the latest NodeJS, and create-react-app installed on your machine.
First we need to create a React application
$ create-react-app semantic_weatherThen navigate to the project folder and install the following npm modules
npm i --save semantic-ui-react semantic-ui-css node-fetch encoding npm-run-allAlso, the following development dependencies are necessary
npm i --save-dev netlify-lambda http-proxy-middleware dotenv Step 2
Create separate folders in /src for components and css.
To get the icons for the weather app, download this set of icons. Copy the /fonts folder from the package into the /src folder of your project.
After you download the icons package, you should also see the css file named weather-icons.min.css in the there. Copy that file into the /css folder we have just created. Also, while you are inside the /css folder, create a new css file named Weather.css and paste the following code in it:
@media only screen and (max-width: 600px) {
  #main-container {
    width: 100%;
    padding-top: 50px;
  }
}

@media only screen and (min-width: 600px) {
  #main-container {
    width: 50%;
    margin: auto;
    padding-top: 50px;
  }
}

.w-icon {
  font-size: 4.5em;
  color: #db3fe2;
}

.w-h1 {
  font-size: 5em;
}

.w-p {
  font-size: 2em;
  margin: 20px;
}

.w-error {
  color: darkred;
}
Step 3
To insure that our pages have access to Semantic-UI css files, we have to add the following line in src/index.js file of our React project:
import 'semantic-ui-css/semantic.min.css';Also, open your package.json file and make sure it looks similar to this:
// package.json
{
  "name": "semantic_weather",
  "version": "0.1.0",
  "private": true,
  "dependencies": {
    "encoding": "^0.1.12",
    "node-fetch": "^2.3.0",
    "react": "^16.8.6",
    "react-dom": "^16.8.6",
    "react-scripts": "2.1.8",
    "semantic-ui-css": "^2.4.1",
    "semantic-ui-react": "^0.86.0"
  },
  "scripts": {
    "start": "run-p start:**",
    "start:app": "react-scripts start",
    "start:lambda": "netlify-lambda serve src/lambda",
    "build": "run-p build:**",
    "build:app": "react-scripts build",
    "build:lambda": "netlify-lambda build src/lambda",
    "test": "react-scripts test",
    "eject": "react-scripts eject"
  },
  "eslintConfig": {
    "extends": "react-app"
  },
  "browserslist": [
    ">0.2%",
    "not dead",
    "not ie <= 11",
    "not op_mini all"
  ],
  "devDependencies": {
    "dotenv": "^7.0.0",
    "http-proxy-middleware": "^0.19.1",
    "netlify-lambda": "^1.4.5",
    "npm-run-all": "^4.1.5"
  },
  "proxy": "http://localhost:9000"
}
Step 4
Now we add the main part of the application – Weather component.
Inside the src/components folder, create a new file and name it Weather.js. Add the following code in it:
// src/components/Weather.js

import React, { useState } from "react";
import {
  Header,
  Segment,
  Container,
  Input,
  Form,
  Loader
} from "semantic-ui-react";
import "../css/Weather.css";
import "../css/weather-icons.min.css";
import { useFetchWeather } from '../customHooks';

const Weather = () => {

  const [inputValue, setInputValue] = useState('');
  const [searchValue, setSearchValue] = useState('dallas');

  const { data, error, loading } = useFetchWeather(
    '/.netlify/functions/getWeather',
    searchValue
  );

  return (
    <Container id="main-container">
      <Segment raised>
        <Header className="ui basic segment centered">Semantic Weather</Header>
        <Segment>
            <Form onSubmit={() => setSearchValue(inputValue)}>
              <Input
                  fluid
                  action="Search"
                  autoFocus
                  placeholder="e.g. Dallas"
                  onChange={e => setInputValue(e.target.value)}
                  value={inputValue}
                  size="large"
              />
              {error && <p className="w-error">Please enter a valid city name. (e.g. New York)</p>}
            </Form>
        </Segment>
        <Segment textAlign="center">
            {(!loading && data) ? (
              <div>
                <h1 className="w-h1">{data.temp} °F </h1>
                <div>
                    <i className={`wi wi-owm-${data.weather[0].id} w-icon`}/>
                    <p className="w-p">{data.weather[0].main}</p>
                </div>
                <h1>{data.city}, {data.country}</h1>
              </div>
            ) : <Loader active inline='centered' />}
        </Segment>
      </Segment>
    </Container>
  );
};

export default Weather;
There is one thing missing in the Weather.js file that we have not created yet. useFetchWeather custom hook. This hook will allow us to make a call to the Netlify function we will be creating soon and get weather details for the city provided in the search bar. It is good practice to keep the custom hooks in a separate file. So we create a new file called customHooks.js in /src folder. If you would like to learn more about the React.js custom hooks, checkout this article
// src/customHooks.js

import { useState, useEffect } from "react";

export const useFetchWeather = (url, city) => {
  const [data, setData] = useState(null);
  const [loading, setLoading] = useState(true);
  const [error, setError] = useState(false);

  useEffect(() => {
    setLoading(true);
    fetch(url, {
      method: "POST",
      body: JSON.stringify({ city: city })
    })
      .then(r => r.json())
      .then(res => {
        if (res.cod === 404) {
          setError(true);
          setLoading(false);
        }
        return res;
      })
      .then(res => {
        const data = {
          temp: res.main.temp.toFixed(0),
          city: res.name,
          country: res.sys.country,
          weather: res.weather
        };
        setData(data);
        setLoading(false);
        setError(false);
      })
      .catch(err => {
        setError(true);
        setLoading(false);
      });
  }, [city]);
  return { data, error, loading };
};
After we add the custom hooks and Weather component, our project folder structure should look like this:
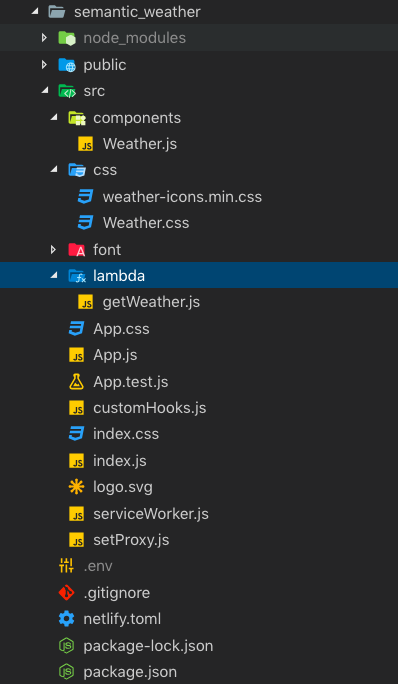
Step 5
We are pretty much done with the front end. In order for the useFetchWeather custom hook to work, we need to setup the back end. For back end we can take advantage of the Netlify functions. It may seem little confusing how all the pieces of Netlify functions work together. But after you set up your first function, it will be much easier to understand.
First thing is first, let us create the netlify.toml file in then main directory of the project, which will be used by Netlify to figure out where the functions are and how to run them.
// netlify.toml

[build]
	Command = "npm run build"
	Functions = "lambda"
	Publish = "build"
Now open App.js file of your project and add the following code to import the Weather.js file we have just created.
// App.js

import React from 'react';
import Weather from './components/Weather';

const App = () => <Weather/>;

export default App;
Step 6
Inside the /src folder create a new folder named lambda. Navigate to that folder and create the function file inside it – getWeather.js.
Add the following code in to the getWeather.js file
// src/lambda/getWeather.js

import fetch from "node-fetch";
require("dotenv").config();

const API_KEY = process.env.API_KEY; // Store your key in .env file

exports.handler = async (event, context) => {
  const city = JSON.parse(event.body).city;
  const url = `http://api.openweathermap.org/data/2.5/weather?q=${city}&units=imperial&appid=${API_KEY}`;

  console.log(API_KEY);
  return fetch(url, { headers: { "Accept": "application/json" } })
    .then(response => response.json())
    .then(data => ({
      statusCode: 200,
      body: JSON.stringify(data)
    }))
    .catch(error => ({ statusCode: 422, body: String(error) }));
};
As you can see at the top of the function, we have an environment variable which stores the API key for making calls to OpenWeatherMap. To get your own API key, refer here: Get OpenWeatherMap API Key.
Once you get the API key, create a file named .env in the main directory of your project and inside the dotenv file, provide the API key:
API_KEY=XXXXXXXXXXXXXXXXXXXXXXXXXXXXDo not forget to add .env name in your .gitignore file. Otherwise your API key will be stored in your remote git repo along with other project files.
Step 7
Before we move on to deploying our app to Netlify, you can run it locally to make sure it is working. In your terminal/command line run npm start to start the app in development mode. You should be able to open localhost:3000 and see the weather app.
Step 8
Next step is it store the project in a remote repository. You can use whatever repository provider you like. I will be storing my project in GitHub.
Once you push the project to a remote repository, we can start the deployment to Netlify. If you do not have an account with Netlify, go ahead and create one!
Step 9
In Netlify:
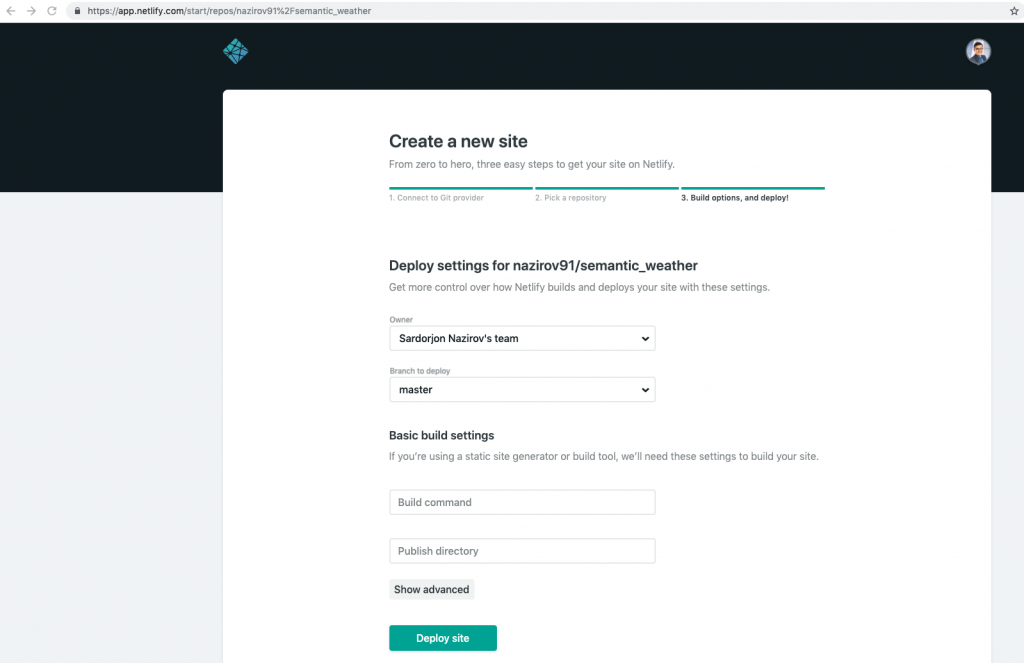
- Open the main dashboard and there you should see a big button called New site from Git. Click on that and it will ask you where you want to get project files from. In my case, I select GitHub.
- Once you authenticate with GitHub (or GitLab/BitBucket), you will see a list of repositories that belong to you. From that list select the Semantic Weather repo and Click Deploy Site
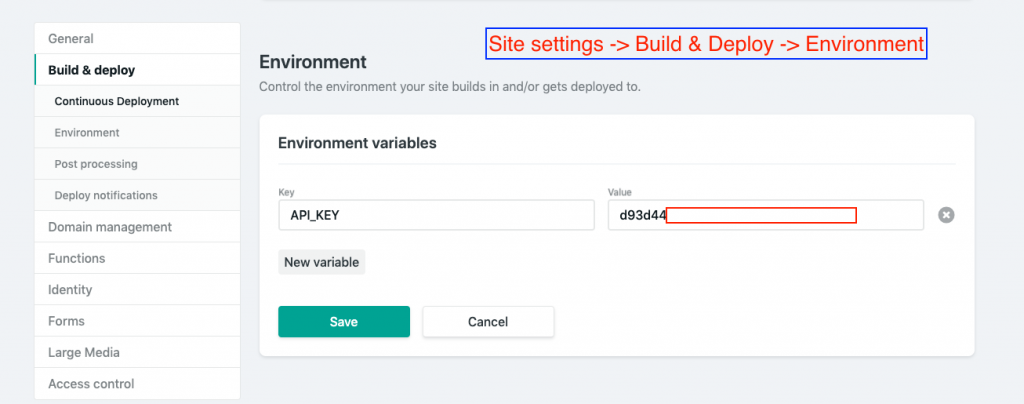
- Last step is to create an Environment Variable named API_KEY in Netlify. Go to Site settings and click on Environment under Build & Deploy side menu. Then add a new variable and set your OpenWeatherAPI Key as the value.
- That’s it! It will take couple of minutes for Netlify to fetch your project files and setup the functions. Once it is done, you will see a message saying “Site is live”.
- If the site is not working, try to trigger deployment manually. It may be having a hard time finding the environment variable.

Thank you for taking your time to read the article!