


How To Configure your Serverless Backend on AWS
This is a continuation of our multi-part series on building a simple web application on AWS using AWS Lambda and the ServerlessFramework. You can review the first part of this series starting with the setup of your local environment at:
You can also clone a sample of the application we will be using in this tutorial here: Serverless-Starter-Service
Please refer to this repo as you follow along with this tutorial.
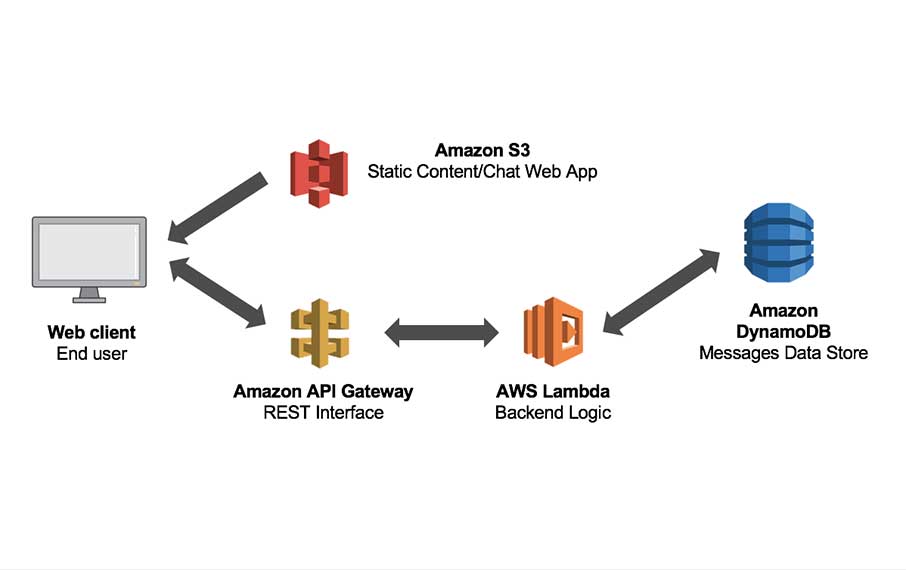
The Serverless Architecture
Serverless programming and computing, or serverless for short, is a software architecture that enables an execution paradigm where the cloud service provider (AWS, GoogleCloud, Azure) is the entity responsible for running a piece of backend logic that you write in the form of a stateless function. In our case we are using AWS Lambda. The cloud provider you choose to run your stateless function, is responsible for the execution of your code in the cloud, and will dynamically allocate the resources needed to run your backend logic, by abstracting the deployment infrastructure for you, so that you can focus on developing your product instead of auto-scaling servers. This paradigm is also known to be called Functions As A Service or (FAAS), and the code will run inside of stateless containers that may be triggered by a number of events that can include: cron jobs, http requests, queuing services, database events, alerts, file uploads, etc.
Serverless Considerations
Since the serverless paradigm abstracts away the need for an engineer to configure the underlying physical infrastructure typical to the deployment of a modern day application, in what is known as the new Functions As A Service (FAAS) reality, the following are a few considerations that should be kept in mind while we proceed through the development of our Single Page Application:
Stateless Computing
When we deploy a serverless + microservice architecture, the functions that we declare as a part of our application API, execute our application’s logic inside of stateless containers for us by our cloud service provider, or in our case AWS. The significance of this is that our code does not run as it typically would be on a server that executes long after the event has completed. There is no prior execution context to serve a request to the users of your application when running AWS Lambda. Throughout the development of your serverless applications, you MUST assume that AWS Lambda will invoke your function as if it is in its first application state every time, and with no contextual data to work with, because your function will not be handling concurrent requests. Your backend is stateless, and each function should strive to return an idempotentresponse.
Serverless + Microservices
When developing a serverless application, we need to make sure that the application is structured in a way in which the functions we declare as part of the backend logic, are defined in the form of individual services that mimic a microservicebased architecture so that we may better be able to reduce the size of our functions. The goal is to loosely couple the functionality between the services deployed as a part of the serverless backend, so that each function handles an independent piece of functionality that will provide a user with a response that does not rely on any other service.
Cold Starts
Because our functions execute inside of a stateless container that our cloud service provider manages for us, in our case AWS, there is a bit of latency associated with each http request to our serverless “backend”. Our stateless infrastructure is dynamically allocated to respond to the events triggered by our application, and although the container is typically kept “alive” for a short time after completion of the Lambda’s functionality, the resources will be deallocated and will lead to slower than expected/desired responses for new requests. We refer to these situations as Cold Starts.
Cold Start durations will typically last from a couple of hundred milliseconds to up to a few seconds. The size of the functions and the runtime language used can vary the Cold Start duration time in AWS Lambda. It is important to understand that our serverless containers can remain in an Active state in AWS Lambda, after the first request to our serverless endpoint has completed its execution routine. If a subsequent request to our Lambda is triggered by our application immediately after the completed execution of a previous request, the serverless lambda that defines our endpoint in the cloud in our stateless containers on AWS, will respond to this next request almost immediately and with little to no latency; this is called a Warm Start, and this is what we want to maintain to keep our application running optimally.
The wonderful thing about working with the ServerlessFramework library is the robust community that contributes to its development and evolution as Serverless becomes more of a thing. Dynamically distributing resources programmatically to deploy applications to the cloud just feels more practical from where I am sitting as an engineer working quietly on the cyber front. Take a second to bookmark this List of plugins developed by the community for the ServerlessFramework. We are going to use the serverless-plugin-warmup package on NPM, to make sure that our functions keep warm and purring like my dad’s old 1967 Camaro. I personally had a thing for Lane Meyer’s (John Cusack) ’67 Camaro in the 1980’s Cult Classic Better Off Dead.
I want my $2!

Configure AWS Lambda & Decrease your Application’s Latency with Warm Starts
As discussed above, we will be keeping our Lambda’s warm during the hibernation season with serverless-plugin-warmup. In this next section, we will walk you through each step of the installation of this plugin. Remember, you can also refer to the sample of the application we will be using in this tutorial to follow along, here: Serverless-Starter-Service.
ServerlessWarmup eliminates Cold Start latency by creating a Lambda that will schedule and invoke all the services you select from your API, at a time interval of your choice, the default is set at 5-minutes. Thereby forcing your Lambda’s to stay warm. From within the root of you serverless project directory, continue to install ServerlessWarmup as follows:
- Run:
$ npm install --save-dev serverless-plugin-warmup
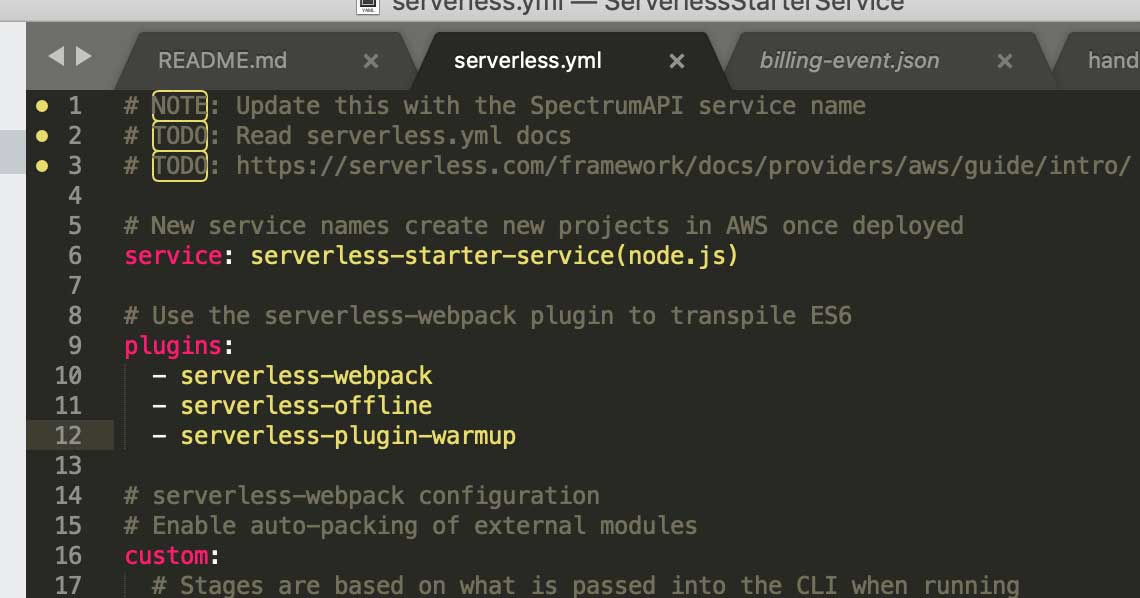
Add the following line to the plugin block in your serverless.yml file that you can find in the root of your service’s directory:
plugins:
  - serverless-plugin-warmup
Look at what my file looks like if you need a reference point:
serverless.yml plugin block
Moving along now, you will want to configure the serverless-warmup-plugin in the custom: block of your service’s serverless.yml file. Remember, each service will always have its own serverless.yml file that will define the AWS Lambda endpoints for each serverless + microservice implemented for each path defined in the functions: block of the file. There are a few configuration settings you can read more about at the serverless-warmup Documentation repository. Here we will go over what we think are the most important settings you should at least be familiar with for now. Your custom: block in your serverless.yml file should look something like this:
custom:
  # Stages are based on what we pass into the CLI when running
  # serverless commands. Or fallback to settings in provider section.
  stage: ${opt:stage, self:provider.stage}

  # Load webpack config
  webpack:
    webpackConfig: ./webpack.config.js
    includeModules: true

  # ServerlessWarmup Configuration
  # See configuration Options at:
  # http://github.com/FidelLimited/serverless-plugin-warmup
  warmup:
    enabled: true # defaults to false
    folderName: '_warmup' # Name of folder generated for warmup
    memorySize: 256
    events:
      # Run WarmUp every 60 minutes
      - schedule: rate(60 minutes)
    timeout: 20
Inside of our custom: block you need to declare a warmup: resource that serverless will use to create a new Lambda function On your Behalf on AWS by the ServerlessFramework. Again, Lambda is going to use the serverless-warmup-pluginto keep your Serverless + Microservices warm, and latency-free. The primary setting that we need to configure is enabled: true. By default, this attribute is set to false because this does have an impact on your serverless + server costs on AWS. Warming up your Lambda’s means that they are computing for a longer time, and costing you more money. We will publish another article in the future that will show you how to determine these costs for you and your business. For now, please look at this calculator to help you estimate your monthly compute OPEX costs. We do like this calculator at Servers.LOL because it gives you a tool that will let you compare your current EC2 costs against your proposed AWS Lambda Serverless costs.
The next property we think you need to know about is the - schedule: rate(60 minutes) attribute in the events: block. By default, the rate is set to 5-minutes. We think for the purpose of this demo application that we can leave it to once an hour to minimize our AWS costs. You can also customize this setting on a more granular level to set it for certain times within certain days of the weeks to make sure your users can expect lower levels of latency at peak hours. For example, you can set your Lambda to Run WarmUp every 5 minutes on Monday to Friday between 8:00 am and 5:55 pm (UTC) with this setting: - schedule: 'cron(0/5 8-17 ? * MON-FRI *)'
If you are being perceptive right now, you will notice that this serverless.yml file is really letting us complete a lot of interesting tasks quickly, and without having to think too much about the impact of the resources we are conjuring-up out of thin air. As you can see Young Padawan, we are slowly, but surely making our way through a concept known as Infrastructure As Code, and we are, albeit moderately for now, programmatically allocating and spinning-up the cloud-based servers we need to keep our Lambda’s warm with this serverless-warmup-plugin.
We will get back to Infrastructure As Code in a bit, but this idea of serverless…servers??
Irony in the Cloud
Understanding AWS Lambda
We really must discuss how AWS Lambda will execute the logic within our functions to better understand, and to have a general idea about a few of the important properties that make up our AWS FaaS paradigm. Below are a few details you should know about how Lambda works with you:
AWS Lambda Specs
Lambda will support the runtime environments listed below:
- Node.js: v8.10 & v6.10
- Java 8
- Python v3.6 & v2.7
- .NET Core: v1.0.1 & v2.0
- Go v1.x
- Ruby v2.5
- Rust
Each Lambda will execute and compute inside of a container with a 64-bit AWS Linux AMI. AWS will distribute our Lambda’s computational needs to each user according to the following system requirements:
- Memory Allocation: 128MB – 3008MB (Allocated in 64MB increments)
- Ephemeral Disk Space: 512 MB
- Max execution time (timeout): 15 minutes (900s)
- Function Evnironment Variables: 4 KB
- Function Layers 5 layers
- Deployment Package Size (unzipped): 250 MB
- Deployment Package Size (zipped): 50MB
- Execution Threads (Processes): 1024
Lambda puts the breaks on the amount of resources that you can use for compute and storage to run and store your functions on the AWS cloud. The following default limits are set per-region by AWS and can be increased by special request only:
- Concurrent Executions: 1000
- Function & Layer Storage: 75 MB
The serverless design paradigm is a language agnostic approach that is meant to give engineers the ability to leverage AWS resources and infrastructure to better scale their products, i.e. your products, to a global market place and to more quickly put your innovation into the hands of the users that need it the most.
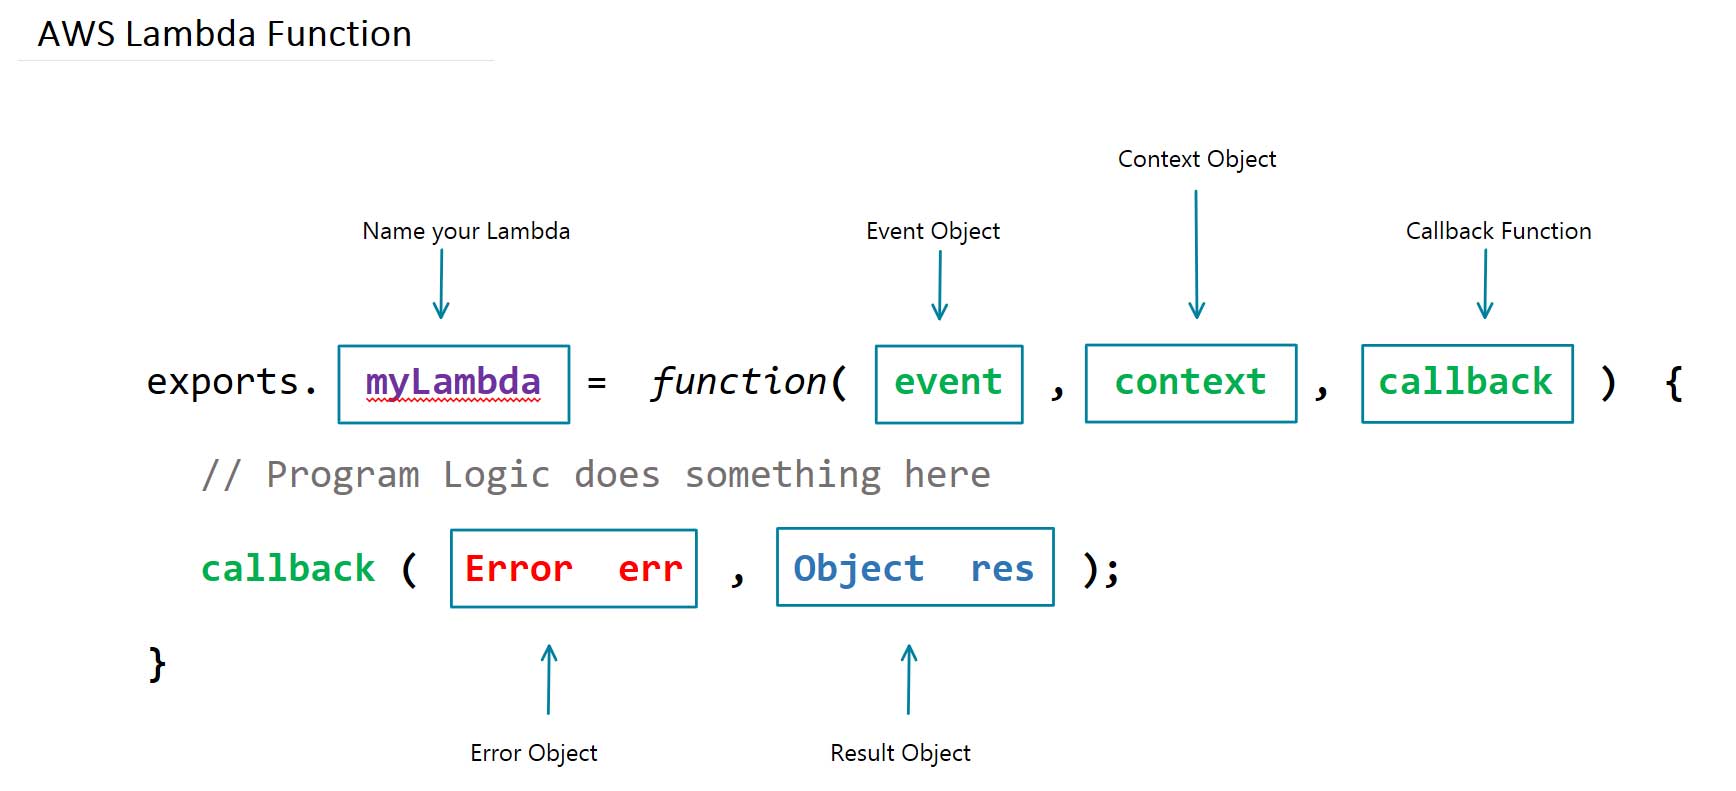
In the image, myLambda is the name of the Lambda function written for the Node.js runtime environment shown above. The event object has all the information about the event that triggered this Lambda for an async response, and in the case of an http-request, it will be the information you need about the specific request made to your application, and its serverless-backend. The context object will have information about the runtime environment that will execute our Lambda on AWS. When AWS completes the execution of the logic within our Lambda function, the callback function will execute and provide you with the corresponding result or error needed to respond to the http-request.
The Stateless nature of AWS Lambda
Because our Lambda functions are stateless events that execute inside of containers on the cloud, all of the code that is run inside of the program’s file in the container is executed and cached, while warm, and only the code in the Lambda function handler is run on subsequent attempts. In the example below, the let sns = new aws.SNS(); method will trigger the first time your container is instantiated on the cloud. The new aws.SNS(); method and the code above it is not run every time your Lambda is invoked. On the other hand, the myLambdaTopic handler function shown as a module export in the example, will trigger itself every time we invoke the Lambda.
let aws = require('aws-sdk');
aws.config.update({region: 'us-east-1'});

let sns = new aws.SNS();

exports.myLambdaTopic = function(event, context, callback) {

  const params = {
    Message: `Message Posted to Topic.`,
    TopicArn: process.env.SNSTopicARN
  }

  let result = sns.publish(params, (err,data) => {
      callback(null, '');
    });

  return result;
};
There is a /tmp directory inside of the 512MB of Ephemeral Disk Space that your 64-bit Amazon Linux AMI gives to your Lambda where your containers are effectively cached when it is executed from the AMS Lambda event that is triggered by your application. Using this directory is not a recommended approach to achieving stateful Lambda functions. There is no way to govern what happens to the memory given for this directory because the cloud provider handles this abstraction of work. When your containers go Cold and are no longer Cached you will lose everything in the /tmp directory.
Choose AWS as your Cloud Provider & Register
I am going to have to assume that you have an AWS Account and are a registered user with AWS for the sake of getting through this article in a reasonable amount of time. I hope that your curiosity has driven you to the wonders of the AWS Console to leave you in a state of despair, let alone paralysis. Do not be ashamed; I really believe that I am not the only person on this planet terrified by the AWS Console when first starting out as a cloud professional. The first thing that ran through my head was, “with what time am I going to figure all of this out now that I have learned how to master the art of the reversed Linked-List interview question“. I terrified myself to say the least. Do not you worry though young Silicon Valley Stallions, we will be here to walk you through every step of each of those services. One day, we will even show you how to launch a Machine Learning application on your very own Serverless backend! I am just not going to show you how to register with AWS.

Create AWS Developer Access Keys
To deploy your application’s resources using an Infrastructure As Code paradigm, you need to connect your development environment to AWS by authenticating your local machine with your AWS Access Keys that you can find within the IAM Service from your AWS Console.
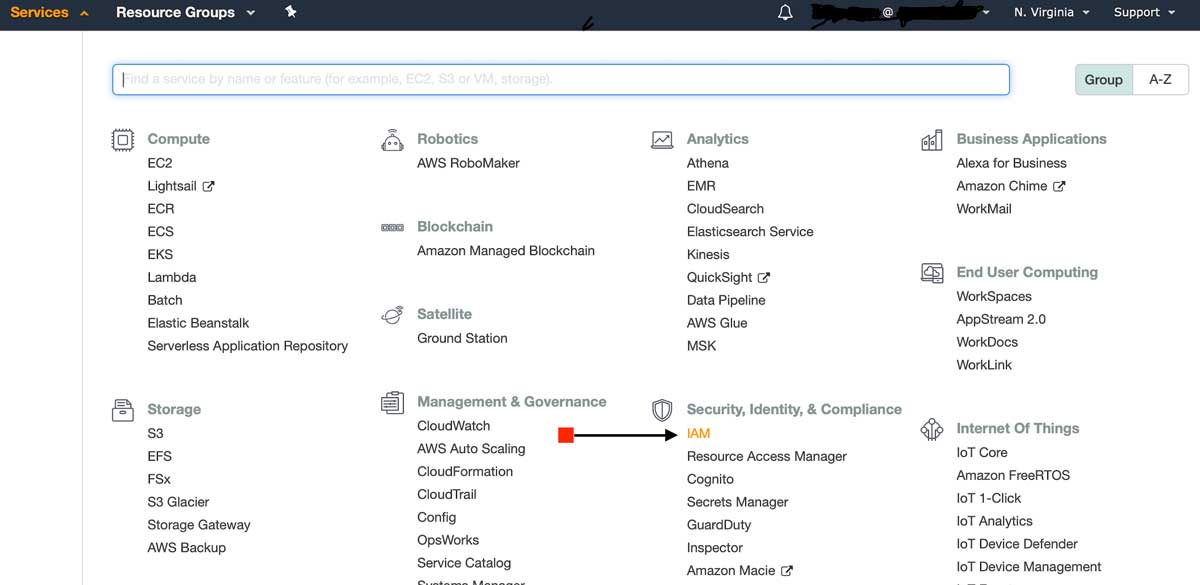
When you get into your AWS Console, you need to click on the Services link on the top left side of the AWS navigation bar in your browser. Your AWS Console will continue to bombard you with everything it has. Take a deep breathe, and look for the Security, Identity, & Compliance section inside of the Services menu. The first service in that section is the AWS IAM service, or short for Identity & Access Management.
From your IAM Dashboard continue to click on the Users button from the navigation frame on the left side of your browser, and then click on the user that you will use to create a new Access Key. When the user‘s information renders itself within the browser for you, click on the tab called Security credentials and create a new Access Key as shown below.
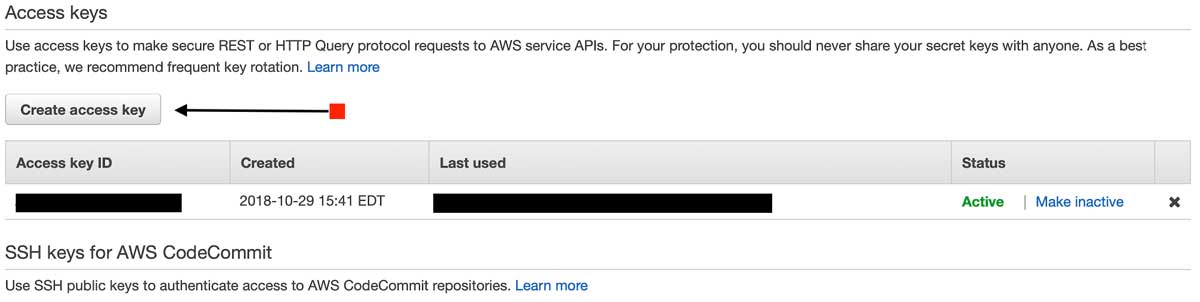
Once you create a new Access Key, both record your Secret Access Key along with your Access Key ID to configure your AWS-CLI locally from your terminal.
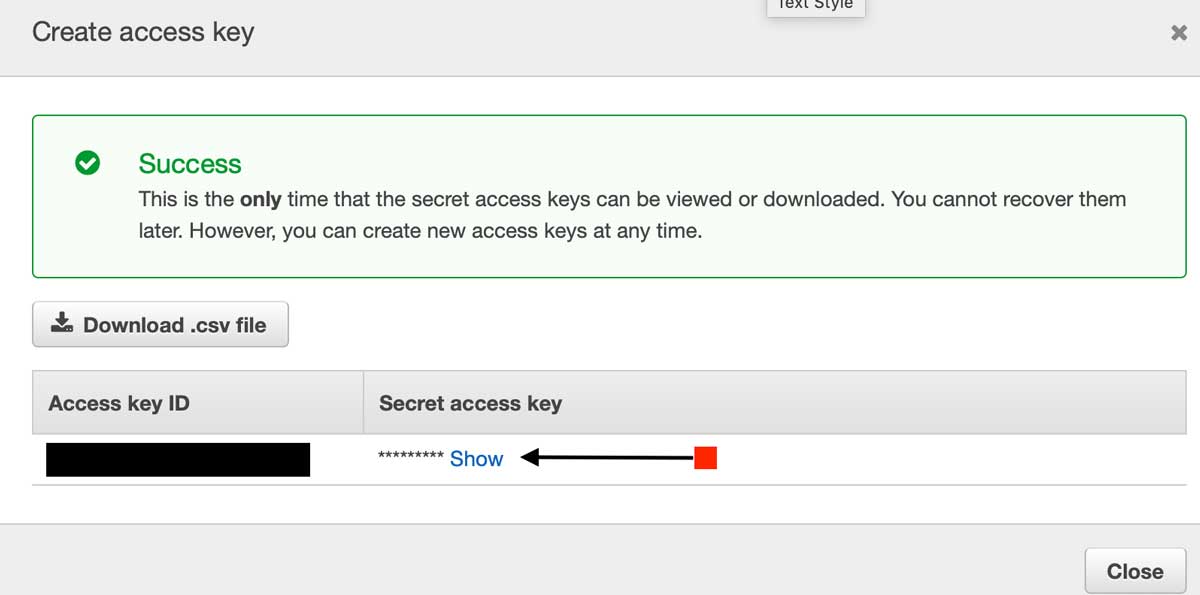
AWS will only let you create two Access Keys per user. It is a best practice to change these keys often and to store them securely. AWS will not allow you to view your Secret Access Key after you initially create it, you must be sure to record it in a safe place, as soon as you see the screen above.
Install the AWS Command Line Interface (CLI)
The demo application we are using today to discuss and teach you these skills are all part of the Serverless Framework technology stack. The awscli needs Python v2.7 or Python v3.4+ and PiP to support our application environment. Below are links to the Python documentation repository, to help you familiarize yourself with these installations:
With Python installed, and using Pip, install the awscli on (Linux, MacOS, or Unix) and run:
$ sudo pip install awscli
Add your Access Key to your AWS CLI
Obtain your Access Key ID and your Secret Access Key from your AWS Console via the AWS IAM services console and run:
$ aws configure
With the credentials obtained from your IAM userID, enter the following information into the terminal prompts:
AWS Access Key ID [****************91RX]: <paste your data here>
AWS Secret Access Key [****************ADsM]: <paste your data here>
Default region name [us-east-1]: us-east-1
Default output format [json]: json
SetUp Serverless Framework locally
To deploy our demo application with a serverless backend to handle our business logic with independent functions deployed to AWS Lambda, we will need to configure Lambda and APIGateway to use the ServerlessFramework. The ServerlessFramework handles the configuration of our Lambda functions to use our code to respond to http requeststriggered by APIGateway. The ServerlessFramework lets us use easy template files to programmatically describe the resources and infrastructure that we need AWS to provision for us, and on deployment, AWS CloudFormation does the job of instantiating the cloud based infrastructure that we call the serverless architecture on AWS. The serverless.yml file is the file that executes the explicit resources that we declare from within the ServerlessFramework, to tell AWS CloudFormation what we need from AWS to run our application. Please make sure to install NPM Package Manager to complete this installation:
- Install the ServerlessFramework globally and run:
$ npm install serverless -g
- Create a project structure that considers the Serverless + MicroService approach and clone the
ServerlessStarterServicedemo application as follows:$ mkdir PayMyInvoice$ cd PayMyInvoice$ mkdir services$ cd services
Critical Step: Install the repo and name it accordingly 5.
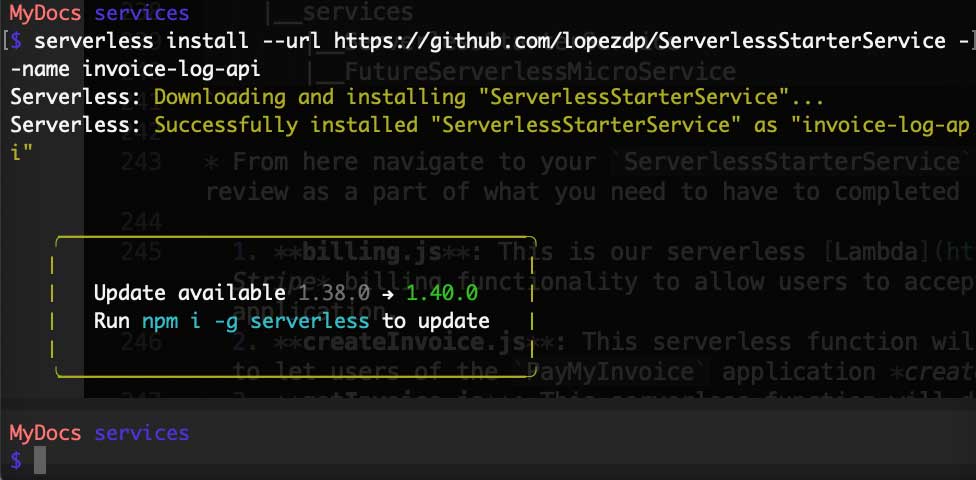
$ serverless install --url http://github.com/lopezdp/ServerlessStarterService --name my-project- In the command above, change the generic
my-projectname passed as an argument and call your serverless + microservice whatever you want. In our case we decided to call oursinvoice-log-api. We will be creating invoices and displaying a log of the invoices that our users send to their customers for payment. Try to use a logical name to describe your service when coming up with your project’s naming conventions. After using theServerlessStarterServiceas a template and renaming it from yourterminal, your output should look something like this:
- Your project structure should now look like this after you rename your template:
    PayMyInvoice
    |__ services
       |__ invoice-log-api (renamed from template)
       |__ FutureServerlessMicroService (TBD)
- From here, navigate to your
invoice-log-apiproject. Currently, you have a directory each formocksandtests, aserverless.ymlfile and ahandler.jsfile that was a part of the original template. We will be refactoring this directory with the files shown below, which we will review later as a part of what you need to have to complete in yourlocalenvironment to deploy this demo application. For now, just take a look at what we are proposing and try to understand the logic behind each Lambda. We will implement these a bit later.- billing.js: This is our serverless Lambda function that will deploy our Stripe billing functionality to allow users to accept payment for the Invoiced that they create in the application.
- createInvoice.js: This serverless function will deploy the Lambda needed to let users of the
PayMyInvoiceapplication create new invoices in the application. - getInvoice.js: This serverless function will deploy the Lambda needed to let users of the
PayMyInvoiceapplication obtain a specific invoice stored in the application. - listInvoices.js: This serverless function will deploy the Lambda needed to let users of the
PayMyInvoiceapplication obtain a list of invoices stored in the application. - updateInvoice.js: This serverless function will deploy the Lambda needed to let users of the
PayMyInvoiceapplication update a specific invoice stored in the application. - deleteInvoice.js: This serverless function will deploy the Lambda needed to let users of the
PayMyInvoiceapplication delete a specific invoice stored in the application. - serverless.yml: This is the configuration template used by the ServerlessFramework to tell AWS CloudFormationwhich resources we needs provisioned for our application and how to configure them on AWS.
/mocks: This is where we save thejsonfiles that we use in development, to mockhttp-request eventsto our serverless backendlocally./resources: This is the directory that we use to organize our programmatic resources and files./tests: This is the directory where we save ourUnit Tests. Typically, we will want to try to achieve at least 80% (or better)Unit Testingcoverage.
- This service relies on the dependencies that we list in the
package.jsonfile found in therootof the serverless project directory.- Navigate to
rootproject directory:$ cd ~/PATH/PayMyInvoice/service/invoice-log-api - Run:
$ npm install
- Navigate to
We will continue the review of these resources and their deployment to AWS in the chapters that follow. For now, we have to make sure you understand what is happening behing the scenes of this new Serverless Paradigm…