


Strapi.js is the most advanced Node.js Framework and Headless CMS out there. Even though it is not as popular as Express.js, it has the power to save weeks of development time for teams working on Node.js applications. With built-in admin panel and Koa.js under the hood, strapi can help you build your next awesome product.

Pre-requisites:
- Basic knowledge of JavaScript
- Node version 10.x+
Outline
- Intro
- What is Strapi.js?
- Features
- Get Started!
Intro
Since the launch of Node.js in 2011, we have seen several frameworks that were built on top of this amazing JavaScript runtime environment. Node.js allowed devs to write fast and robust APIs in minutes. Frameworks gave it super powers. The most popular framework for Node.js is and has been Express.js. Main reason for its popularity is its simplicity and minimalistic style. It accelerates Node.js project development even more. Besides Express.js, there are other frameworks such as Hapi, Koa, Meteor and Sails which have found their way into the hearts of developers. In this article, I would like to write about one Node.js framework that has been immensely underrated in the Node community, but has the power to save weeks of development – Strapi.js. Just stick with me here and we will look at the features of this powerful framework and explore what we can do with it.
What is Strapi?
Strapi is an open source Headless CMS based on Node.js. It comes with a flexible and customizable admin panel to build fast and secure content APIs. And it is used by thousands of companies around the world such as IBM, Walmart, Discovery and others.
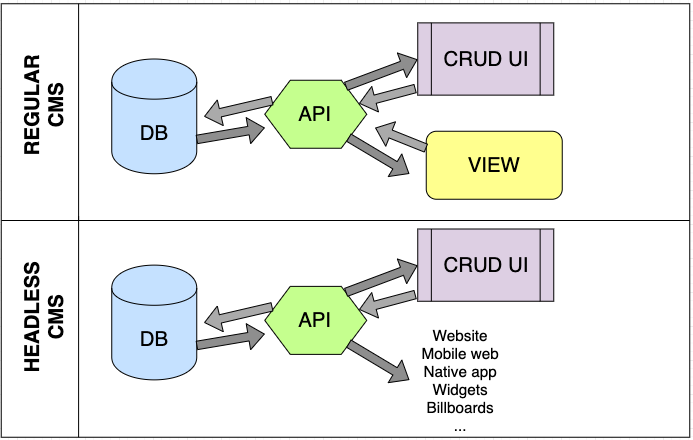
But what is a headless CMS in the first place?
Headless CMS is a type of content management system, such as WordPress, but without the view layer/front end (the head). It means we are not tied to one way of displaying data. We can just plug it into React, Angular or Vue alike view layers. It just provides the APIs and CRUD UI and it can be used with websites, mobile apps widgets, native apps etc. Strapi supports RESTful APIs and also GraphQL.
Features
There are a lot of reasons why you should give Strapi a try on your next project. Below we will go through the main ones.
Koa.js
Strapi is actually built on top of Koa.js, another Node.js framework made by the team who created the Express.js. Koa is a small and more expressive tool which is predicted to be the next generation Node.js framework. Having Koa.js under the hood makes Strapi future proof.
Plugin based
Almost everything in Strapi is plugin. Some of the plugins are installed by default upon creation of the project. Others can be created based on user needs. The real advantage of plugin based framework is that everything is customizable and extensible. Don’t like how the Admin Panel looks, go ahead, customize it. Can’t find the right plugin you are looking for, just create one!
Robust Content Management
Strapi comes with a built-in content management plugin that allows to easily CRUD content, including media files. Admin user interface is super user friendly and anyone can get started with it within minutes. The fact that the content management feature is actually a plugin means that it can be extended to fit any business needs.
React.js
Strapi Admin Panel is built using React.js and the source code is right there inside the project for you to modify if need be. Advanced functionalities of React allows Strapi to deliver amazing user experience.
Content Type Structure
Designing content type structures is made easy by available field types in the Content Type Builder plugin of the Admin Panel. The following types are accessible right out of the box:
- Text Paragraphs
- Boolean
- Date
- Password
- List of choices
- Media files
- JSON
- String
- Relation to other Content Types
- Number
Similar to other plugins, content type builder plugin is also extensible. You can add your own field types to the list!
Secure and flexible APIs
APIs in Strapi can be requested using GraphQL or REST. Calls to all endpoints are secured by default, utilizing the Authentication and Permissions plugin. More often than not, we want our websites or apps to be used by people with different roles. And developing your own RBAC (Role Based Authentication System) can take weeks of development. Strapi provides that functionality out of the box!
Get Started!
Before we get started with Strapi, make sure you have the latest version of Node (10.x and above)
To install Strapi globally on your machine run the following
npm install strapi@alpha -gNow we can start our new project.
Sample app – Strapi Cycle Bike Rental
We are going to build a backend for a simple bike rental shop using Strapi.js. We want to have APIs to manage clients, bike inventory and orders.
/users– to manage the client base/bikes– to manage the bike inventory/orders– to keep track of the orders
The beauty of the framework comes with the “Out of the box” configurations. Once we set up the server and add new models, necessary endpoints for CRUD operations get generated automatically. We can just start using them. Indeed, the APIs can be modified depending on the requirements.
Steps
Step 1
Run the following command to set up a new Strapi project
$ strapi new strapi_cycleWhen prompted with the options in the terminal, we can decide which database we want to use and the kind of configurations we want to have. For simplicity, we will be using a local MongoDB database.
- Choose your main database: MongoDB
- Database name: strapi_cycle
- Host: 127.0.0.1
- +srv connection: false
- Port (It will be ignored if you enable +srv): 27017
- Username: <empty>
- Password: <empty>
- Authentication database (Maybe "admin" or blank): strapi_cycle
- Enable SSL connection: false
Note: If you have any issues connecting to your database, make sure you are using correct username/password. Also, leaving the Authentication databasequery blank can cause problems.
Step 2
Navigate to the project folder and run
$ strapi startCommand will start the server on port 1337. So if you navigate to localhost:1337 you should see a page similar to this:
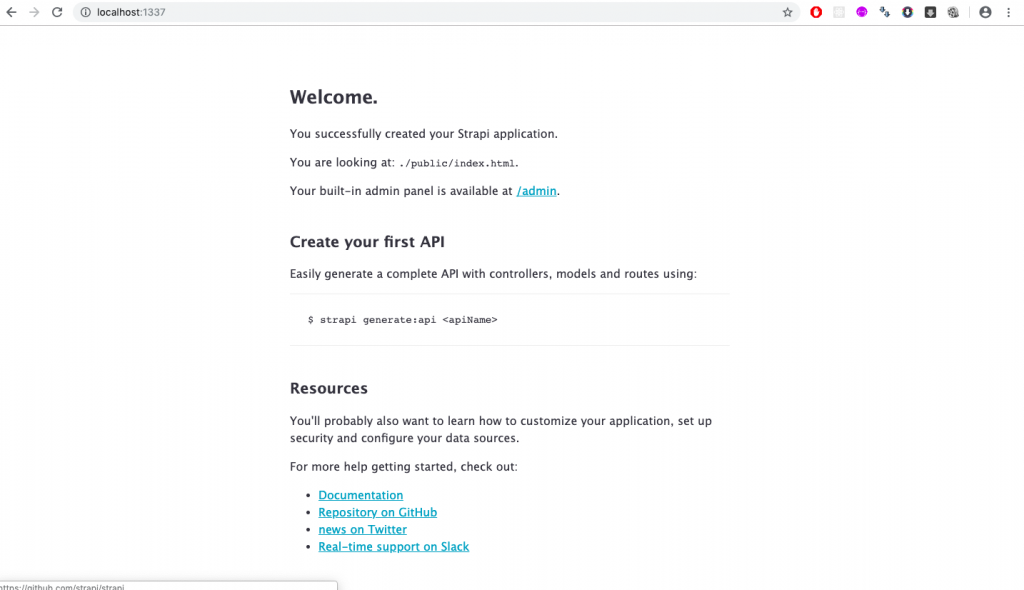
Step 3
In order to create the endpoints for our bike rental shop, we navigate to the built-in admin panel. Click on the /admin link on the welcome page and you should be redirected to registration page.
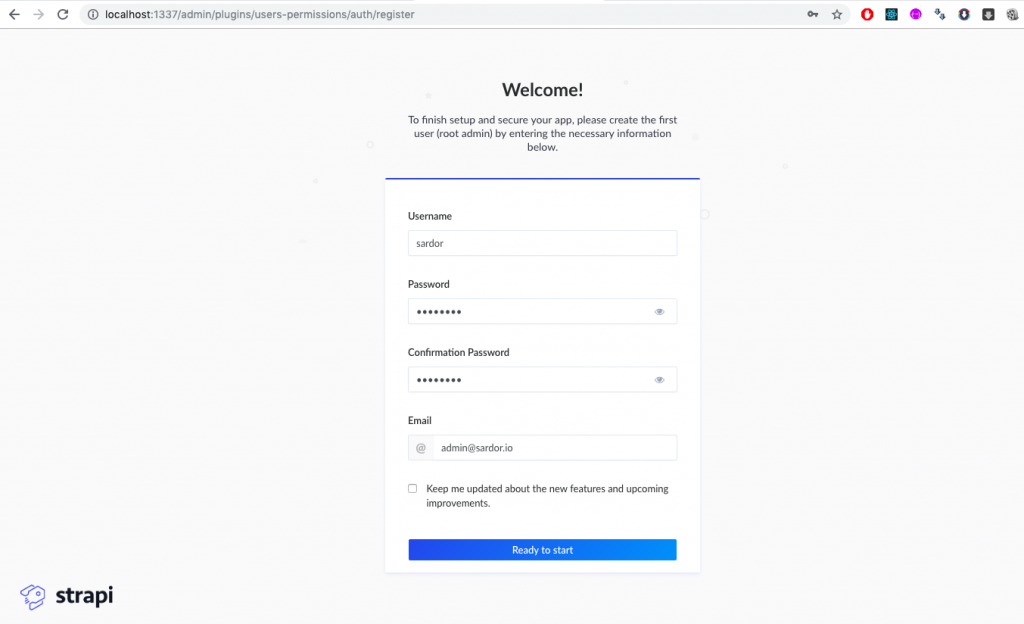
Since there are no users in the database initially, the user you register first on the this page will have an admin role. Later on when we add more users without specifying the role, they will have a Public role by default. New roles can be added in the Roles and Permissions menu of the sidebar.
Step 4
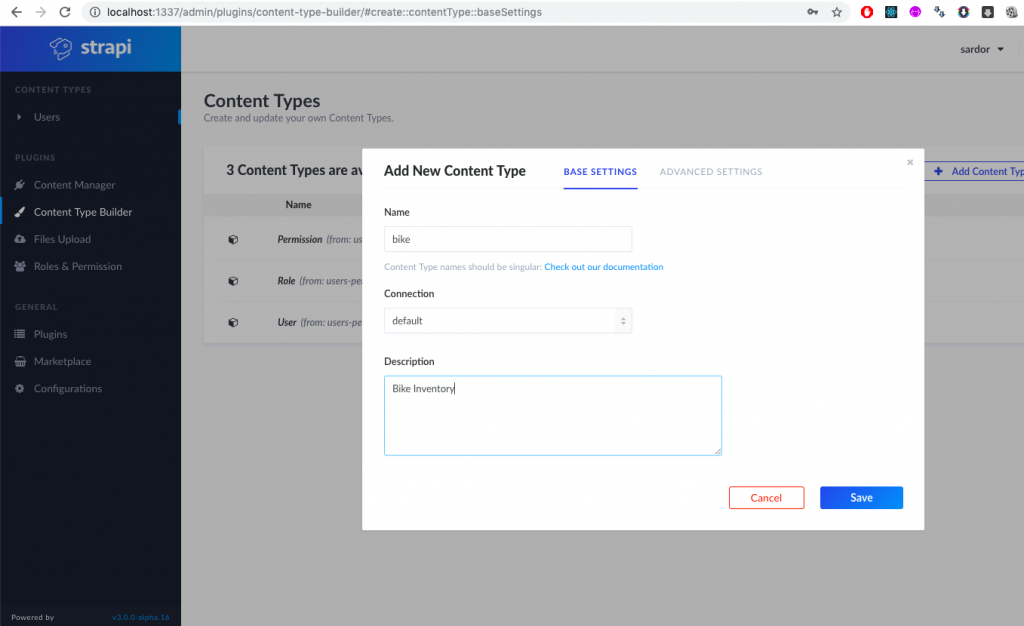
Click on the Content Type Builder plugin and you will see that there are 3 content types already created by default. Those content types belong to the Roles & Permissions plugin. Since we do not need to use roles or permissions for our backend, we will just ignore the roles and permissions types for now. Lucky for us, the user content type is already there.
Click on the Add new content type button and enter the details for the model. First we create the bike model.
Step 5
Once we create the content type, next we have to add new fields. Click on Add new field button and add new fields for our bike model.
| Name | Type | Value |
|---|---|---|
| model | String | |
| rate | Number | |
| status | Enumeration | Available,Taken,Broken |
Step 6
Repeat steps 4 and 5 for Order model with the following fields
| Name | Type | |
|---|---|---|
| rental_start | Date | |
| rental_end | Number | |
| cost | Integer | |
| user | Relation with User | |
| bikes | Relation with Bike |
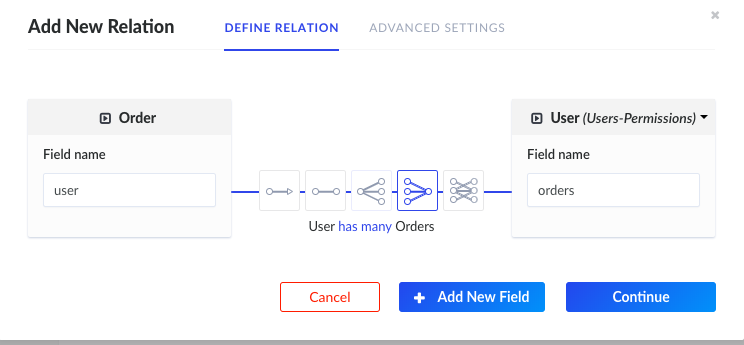
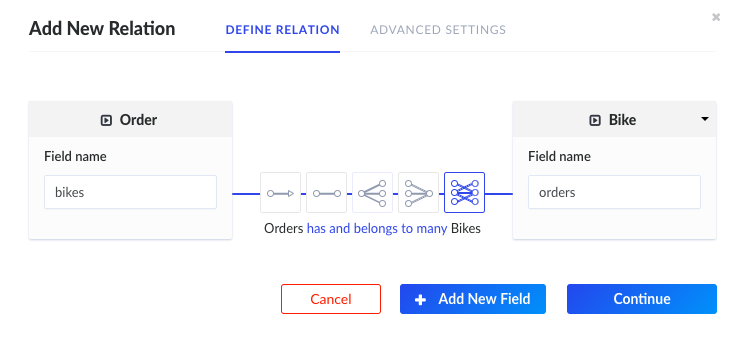
An important thing to note here is that creating relations between models is ridiculously easy with Strapi.js. When selecting the type of the field for a model, just select the Relation type and you will be given options on how 2 entities should be related to each other.
In our case, an order can belong to a single user and a many bikes belong to many orders. So their relationship will be as follows:
Step 7
That’s it! We are pretty much done creating the APIs for users, bikes and orders. In order to see if they are working properly, let’s add some records and make calls to the newly created endpoints.
On the top of the sidebar, we have a list of our models. Click on each of them and add new records with dummy values.
Step 8
Now we can test our APIs using Postman. If you do not have this awesome tool installed on your machine, please do yourself a favor and download it from here.
Before we can make calls to the endpoints, we need to acquire a token from server. In order to do that, we will send a POST message to localhost:1337/auth/login with the following payload in the body
{
	"identifier":"sardor",
	"password":"<your_password>"
}
After that we can use the token in the header of each API call
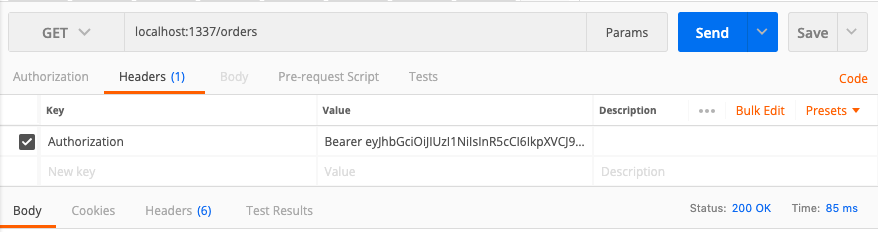
Response body for /orders
[
    {
        "rental_time": "2020-04-13T13:00:00.000Z",
        "rental_due": "2020-04-12T16:00:00.000Z",
        "cost": 30,
        "bikes": [
            {
                "model": "M001",
                "rate": 10,
                "status": "Available",
                "_id": "5cbb1f03f3dc0d992df68176",
                "createdAt": "2019-04-20T13:30:43.846Z",
                "updatedAt": "2019-04-20T13:30:43.965Z",
                "__v": 0,
                "id": "5cbb1f03f3dc0d992df68176",
                "orders": null
            }
        ],
        "_id": "5cbb1f9cf3dc0d992df68177",
        "createdAt": "2019-04-20T13:33:16.558Z",
        "updatedAt": "2019-04-20T13:33:16.687Z",
        "__v": 0,
        "user": {
            "confirmed": true,
            "blocked": false,
            "name": "",
            "_id": "5cbb1eb7f3dc0d992df68173",
            "username": "jbourne",
            "email": "jbourne@jb.com",
            "provider": "local",
            "__v": 0,
            "role": "5cbb19ea6369dd710e43a720",
            "id": "5cbb1eb7f3dc0d992df68173"
        },
        "id": "5cbb1f9cf3dc0d992df68177"
    }
]
We are getting 200 status code, which means our APIs are working! If you pay attention to the body of the response, relation among the fields are implemented correctly as well.
Cheers!