


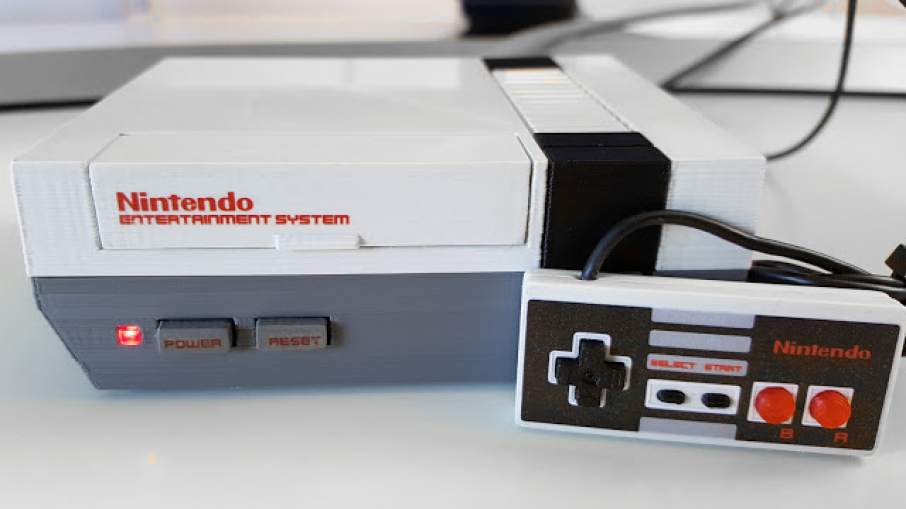
3D PRINTED NINTENDO NES
Sorry Nintendo, our 3D printed mini-NES is way better than yours.
It was inevitable… I have a Raspberry Pi, I have a 3D printer, I’m a huge nerd…
At some point I was going to print a case for it in the shape of the old Nintendo Entertainment System.
In the end, this project turned into more of a love-letter to the NES than just printing a case.
I learnt a lot of new things about Linux, 3D design, wrote my first Python program and had a blast doing it…

It’s quite popular and loads of people have made some really great builds using it. Since I was just starting out with Raspberry Pi and Linux, I’d use RetroPie as the base software for my project.
INITIAL CONCEPT:
There are loads of models on Thingiverse of NES-shaped Raspberry Pi cases. Many of them distort the NES aspect ratio though, ending up with a kind-of super-deformed chibiNES.
Cute, but not exactly what I wanted.
So I dug out my old NES and took some measurements. I was going to design my case from scratch.

To make the case as compact as possible, I scaled down the real NES dimensions to 40% of actual size.
This gave me just about enough room for the Pi to sit transverse, USB and network ports on the left, power and HDMI at the back.
I could make a cut-out for the microSD card and would relocate two of the USB ports to the front where the controllers would be on a real NES.

As I got further along with the design and started to model the top half, I wondered if I could do anything to make the cartridge slot functional.
At first, I thought about making a NES cart-shaped caddy to hold the microSD card.
A guy called wermy did that with the SD card on his RetroPie build the “Game Boy Zero“. It turned out really nicely but ultimately I came up with another idea that I hadn’t seen done before.
NFC.
A while ago I picked up an NFC reader based on the PN532 from NXP, intending to play around with an Arduino and some tags to control room lighting.
My plan here would be to make a little replica NES cartridge with a tag inside and have the Raspberry Pi launch a game when it reads the tag.
Cool idea right?
NFC has been done on the Raspberry Pi but I couldn’t find much information. Adafruit has a rather sparse article about getting libnfc compiled, but I soon found it a bit more complicated than I thought.
Firstly, there are different kinds of tags. The MIFARE Classic 1K, often bundled with NFC readers, aren’t compatible at all with many Android phones including mine.
I wanted to be able to write to the cartridges with my phone, and then have them read by the Pi. This meant starting with a universally compatible tag.
The tags I bought to experiment with, are NTAG216s. These are NFC Forum Type 2 tags from what I’ve read they’re compatible with all Android phones. They also have plenty of writeable memory, with 888 bytes available.
On my phone I use NFC Tools Pro. It’s pretty good, you can read/write tags with things like WiFi and Bluetooth pairing info, contact details etc. and it’s all nice and easy to use.

Eventually I found that I’d only need to write the console and rom name to the tag and could use that to lookup and launch the game on the Raspberry Pi itself.
The issue I had trouble to start with, was actually reading that information in the first place.
NDEF, the structure of the writeable data, is fairly transparent and simple to use on Android. But I couldn’t find anyone that had read these NDEF records with a Raspberry Pi.
All the documentation I found on the subject was a bit over my head and whilst I could read the tag’s ID easily enough, I couldn’t get any NDEF data.
After some searching, I came across “NDEF Library for Arduino“. With this, the plan would be to read the NDEF records with an Arduino, then send them to the Raspberry Pi.
Not the most elegant solution I know, but I was probably going to need to use an Arduino at some point to run a shut-down/power switch for the Pi, so… two birds I suppose.
Speaking of shutdown switches… because the Raspberry Pi doesn’t have any sort of power switch people have designed their own but they’re all pretty expensive.
Since I’d decided to use an Arduino to read the NFC anyway, I would just have a go at writing my own program to do the power management.
CODE TIME ; )
The software for this project is in two parts. An Arduino sketch to read the NFC tags and manage the power switching, and a Python script running on the Raspberry Pi to launch the games.
The two communicate over serial. I could have used I²C, but I was already familiar with serial on the Arduino and could also use it for debugging.
Arduino:
I’ll post my code here because I’ve always found it useful to read other peoples programs.
However I can’t vouch for it’s quality, it works and I’ve written comments where I could, but I’m no expert.
Warning. *lots* of code below, prepare to scroll…
It uses the NDEF library that I found earlier to read the tag UID and the first two NDEF records, then sends it over serial to the Raspberry Pi.
We also control a WS2812 LED, lighting it in different colours depending on status messages received from the Raspberry Pi.
The NDEF data is sent in one line, like this: [“$UID”, “$CONSOLE”, “$ROM”, \n]
Each part is separated by a comma and space “, ” so that when I read it with the Raspberry Pi program, I can use the “, ” to chop-up the string into the data I need.
I also use the “UID” field to send other information to the Pi, like if a cartridge is ejected and when to perform a shut-down.
The NES ‘reset switch’ operates a few functions; a single press sends a reset message to the Pi, a double-press, toggles the status indicator light.
Pressing and holding the reset switch turns the Raspberry Pi on, pressing and holding for a bit longer will shut it down and cut the power.
After the main power is plugged in, the Arduino goes into a sleep mode and turns off the NFC reader.
This is important because when it’s running code, the Arduino draws around 30mA at 5V, the NFC reader takes another 80mA.
Granted that’s not outrageous, but the Raspberry Pi itself is very low-power and only consumes about 300mA when running games, so more than 100mA when ‘off’ is not really acceptable.
In sleep mode, waiting for a button press to wake up, the total standby current is less than 10mA.
Raspberry Pi:
I chose Python because I hadn’t used it before and wanted to try something new, also there’s loads of on-line help to learn the basics.
I really like Python actually, it’s very easy to write and after getting used to the indentation I got on quite well with it.
It’s my first effort here so there are a couple of hacky bits, because I don’t really understand Linux all that well yet.
Again I’ll post the script, but like my Arduino programming, it’s by no means exemplary code: *scroll time*
The program listens to the serial port to find the console and rom information sent by the Arduino.
We look up the console name in list of valid emulators, then look for the rom to see if there’s a file with the correct name stored on the SD card.
If it finds one, then when the power button is pushed down, it launches the emulator and game. If it doesn’t then it tells the Arduino to light the indicator in red to show a read error.
In order to manage the power, on boot-up, it will set a GPIO pin HIGH. This is monitored by the Arduino so that it can tell if the Pi is running by checking the status of that pin.
The program also checks the serial port for a shut-down message and will safely shut-down the Pi when it hears one.
This means I can shut-down the Pi normally through software or by long-pressing the ‘reset switch’ and after it’s finished shutting down the Arduino will detect it, and cut the power safely.
3D DESIGN:
")
I’ve used Tinkercad to design stuff in the past. For this project I’d ‘graduate’ to 123D Design. It’s has a few more features, yet is still simple enough to get to grips with if you’ve got limited CAD experience like I do.
I started by blocking out the rough shape, transferring my scaled dimensions over to the computer.
I tried to keep as much of the design in proportion to the real NES. But made some concessions with details like the front switches being a bit larger than scale for ergonomic reasons.
One thing I was quite pleased with, is the snap-fit feature I incorporated. Noé Ruiz from Adafruit made a video that shows a really cool way to have a case snap closed.

You can see the little triangle-shaped tabs on the lip between the case halves. They click quite nicely and hold the case together really well, it means I don’t have to waste space building in screw posts.
Because of the small design I was going for, I’d have to remove the USB sockets from the Raspberry Pi board in order to include the cartridge slot and keep all the proportions correct.
Since I intended to move two of them to the front anyway this wouldn’t be too much of an issue.
For the final case I wanted to use filament match the colours. Faberdashery have a wide range of colours available, and their Monotone Mix Pack looked ideal to match the NES’ shades.
Since that filament was a bit more(4x) expensive than the eBay PLA I normally use. I made all my test prints with cheap-o plastic.

Comically, I didn’t have a screwdriver of the right size that was long enough to reach all the screws. So I couldn’t take my own NES apart to see how the cart slot worked.
From tear-down photos though, I could see the original cartridge latch mechanism would be too difficult to 3D print on a small scale and have work reliably.
After some idle searching of eBay, I uncovered an odd yet perfect solution.
Bin lids…
Apparently the latches on them wear out, and there are people selling cheap replacements on eBay. It turns out they’re just about the right size to use as a latch for my cartridge slot.
This will clip into a mount on the bottom of the case and accept a peg attached to the cartridge tray.
It turned out, the spring in the latch itself is strong enough to lift the cart mechanism, and that makes the rest of the design much simpler.
Next… the front switches.
The kind I used, latching push switches, are the same type as the power switch on the original NES. This sort of button has a spring inside and a pin that keeps the switch closed.

The blue plunger has notches that trap an L-shaped pin (you can see the pin through the little window on the bottom) It keeps the switch on until it gets pressed again.
For the power switch, I left the pin in place so I had the clicky on/off feel. For the reset switch I removed it, to make a normal momentary button, just like the reset switch on the original NES.
I printed the rest of the bits of the case to check the dimensions and adjust the model where necessary.

The test case fits everything nicely (although the clear plastic does look a bit weird in photos).
ELECTRONICS:
I designed the connections between the Arduino and Pi to use the top ten GPIO pins so I could mount the Arduino directly to the Raspberry Pi using a 2×5 header.
All the electronics would then sit in the case behind the USB ports.

The NFC reader mounts underneath the cartridge tray connected to the Arduino with a piece of flat cable.
There’s enough length on it for the case halves to be splayed apart if I need to dismantle the unit and the Arduino ‘lump’ unplugs from the Pi so I can update the ‘firmware’.
I did order some FFC cables and connectors but got impatient waiting for them to arrive and just soldered everything together.
When they do get here though, I might make a PCB to mount it all, but until then I’m happy enough.
3D PRINTING:
Printing all the parts took around 6.5 hours with all the colour changes.

Assembly:
I attached the black pieces with super-glue and apart from the screws holding the Raspberry Pi itself in the case, everything else snapped together.

The wiring for the switches wraps behind the cart slot and the NFC cable needs to be folded up into the roof of the case to allow it to move freely.
The front lid hinge is a couple of short lengths of filament. I printed a cosmetic piece to cover the opening and match the lines on the original NES.

The cartridges:

They’re designed to be printed in two halves, this meant no support material was needed and both visible sides would have a consistent surface finish.
The carts are lined-up with little pegs and super glued together with an NFC tag embedded in the middle.

I printed the labels on slightly thicker than normal, 120g/m² paper. I ‘laminated’ them with clear packing tape and stuck them in place with super glue.
CONTROLLER:
Seeing my little replica next to it’s full-scale counterpart, I couldn’t help thinking about the controller.
The NES controller is a truly iconic piece of design. The silhouette alone pretty much represents video-games entirely by itself. I wanted to make one.
So I fired-up 123D again and plugged some scale measurements into it. Serendipitously, an Arduino Pro Micro knock-off, fits perfectly inside a 40% scale NES controller.

At such a small scale, finding room for everything in the controller would be tricky. I did have some small tactile switches on hand that would work, just 1.5mm high.
To accommodate them, I etched a simple little PCB to mount the buttons to the Arduino. This was easier than chopping up bits of perfboard to try and get the right spacing laid out.

Not the prettiest thing. To keep the proportions correct I even had to cut legs off some of the switches so it’s definitely a bit ugly on the inside.

Initially, I transferred some graphics to the controller and they looked great, but I accidentally damaged the finish with an acetone thumbprint that marked the surface underneath.
I didn’t have any more ‘Architect’s Stone’ filament to make a replacement so I printed the graphics on sticker paper, laminated it with packing tape and used that to cover it up.
The USB plug cover was modelled after the shape of the original NES connector and recessed so it’d sit flush with the case.

It’s even surprisingly playable. I won’t be doing any marathon playthroughs with the dinky little pad, the tiny buttons are a little stiff, but it is perfectly serviceable and turned out to be one of my favourite parts of the build.
CONCLUSION:

This project took longer that I first thought, but I enjoyed it immensely. It sharpened up my Arduino coding, I learned some Python and used Linux properly for the first time.

I also really improved my 3D printing ability, both in CAD and the printing process itself.
In the end I’m very pleased with how this project turned out. I met all of my initial goals and finished with a cool, functional piece of hardware that’s pretty unique*.

* ADDENDUM:
D’oh. I’ve been working on this for weeks, and even wrote-up most of this post before this was announced…

I was thinking of making a few more units to sell. Oh well never mind, gg Nintendo.

Mine’s a bit smaller than Ninty’s though ?